How to disable the built-in webcam on Windows 10 laptops
Worrying about someone spying on you? Make sure to disable the built-in webcam on your laptop if you don't even use it and here is how to can you do that.

Privacy is the most important thing that you need to protect in order to prevent your confidential information leaked out. That includes identity information, documents, photos, videos, voice, and so on. For best practices, you should turn off all sensors that you don’t use frequently on your device.
Most Windows 10 laptops come with a built-in webcam. Some laptops also have a webcam usage LED indicator to let you that the webcam is being used. However, to make sure that the webcam is completely off today, we will show how to disable the built-in webcam on your laptop.
1 How to disable built-in webcam via Device Manager
To disable a webcam on Windows 10 laptop:
- On your keyboard press Windows logo key + S, to open the Search dialog.
- Type Device Manager, click Open.

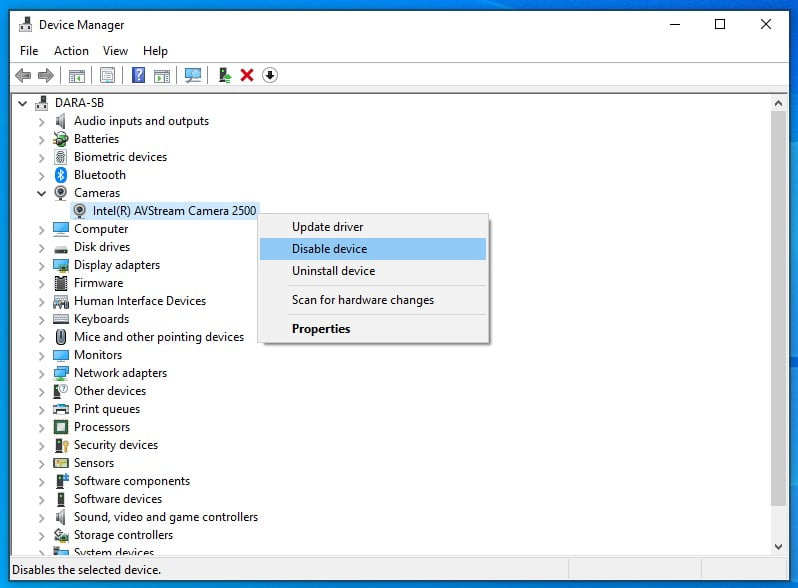
- On Device Manager, expand the Cameras device group.
- Right-click on the list camera device module.
- In this example on Surface Book, Right-click on Intel(R) AVStream Camera 2500 > Disable device.

COMMENTS
Let us know what you think!
We appreciate hearing your thoughts, questions, and ideas about “ How to disable the built-in webcam on Windows 10 laptops”. Please post respectful comments and on topic. We will be replying back to you as soon as possible.
Share your idea about "How to disable the built-in webcam on Windows 10 laptops".